Ultra fast Thunderbolt NAS with Apple M1 and Linux
In this post I discuss how you can upgrade a NAS Server by adding Thunderbolt 3 for lightning fast connectivity at 20 or 40Gbps. This particular implementation is specific to an Apple Mac Mini M1 and a Linux NAS server on an older Supermicro X10SRL-F motherboard, but the principles should be the same on similar architectures and operating systems.
I’m running the latest (Q3 2021) linux kernel on the NAS Server:
Linux nas-04 5.13.4-1.el7.elrepo.x86_64 #1 SMP Wed Jul 21 23:02:00 EDT 2021 x86_64 x86_64 x86_64 GNU/Linux
I should note that one major caveat to this configuration is that it’s point to point between two computers via Thunderbolt 4 cable(s). The networking functionality of the NAS hasn’t been disrupted or replaced, it’s simply augmented with another communication medium between two nearby computers. Thunderbolt allows for bridge mode, so multiple devices can be connected in series.
My Motivation(s)
This implementation isn’t particularly novel. It is however relatively new and a lot of people that might not otherwise be aware of this approach to fast storage might find it interesting. In particular, people with smaller system disks that are non-upgradable that do Video Editing, people that shuffle VMs in their homelab, et al. There are a lot of existing Thunderbolt Direct Attach (DAS) enclosures (OWC makes some nice ones - no affiliation), but based on my cursory research I wasn’t able to find much that delved into using Thunderbolt’s networking capability to connect to an existing NAS server (albeit point-to-point). I like the idea of having a pseudo-DAS via NAS over PtP Thunderbolt. The Thunderbolt 4 spec includes fiber, so eventually cable distance won’t be a limiting factor.
Because I wasn’t able to find a lot of documentation about the linux thunderbolt interfaces and there are not a lot of user-space tools presently available (Q3 2021), I decided to compile my thoughts and output captures here.
I’m a data hoarder and I still have various data going back a couple of decades. My data consist of email from the late 90’s, old hard disk images, documents, source code, databases, pictures and other digital things I’ve created or collected over the years. Much of it is in archival (old MIDI files, DOS games and similar), but occassionally I will seek something out which often requires mounting a disk image or searching a large file index. As a result, I’m always exploring ways to improve my home computer lab. Plus, I just enjoy pushing the limits of performance.
After upgrading my homelab network to 10Gbps (~ 1,250 MB/s) I was quite happy with the overall performance. However, I quickly found myself upgrading the NAS with NVMe disks and even striping several of them for maximum performance. As NVMe disks and interfaces have gotten faster I’ve found myself saturating a 10Gb ethernet network. Thunderbolt is exciting for several reasons, but most notable for me is the sheer speed and bandwidth capability.
Adding a Thunderbolt 3 PCIe Add-on Card

Adding a single 4 lane PCIe 3.0 card to an existing NAS server in a SOHO is a relatively straightforward process. I wasn’t sure that the card I selected would work for a few reasons:
- I didn’t know if Thunderbolt required modern CPU architecture. Intel is including Thunderbolt in the CPU of the forthcoming Ice Lake processors (I think), but for now it remains an external add-on chipset.
- My NAS, as I suspect many other Homelabbers and hobbyists doesn’t have a state-of-the-art processor or motherboard chipset.
- I reasonably concluded that the latest Linux Kernel and corresponding modules/code would support Thunderbolt but I wasn’t sure of the extent of compatibility and/or any “X Factors” that might arise from my specific hardware / software combination and use case.
I set aside my trepidation and decided to just try it. No guts no air medal, right?
There is a hardware “hack” involved with implementing this card in an older motherboard. Fortunately, it’s an easy one and the card vendor provides almost everything needed in the box. I haven’t delved into the software override functionality yet, so this hardware modification may not be necessary at all, YMMV.
What’s notable about this configuration is that the motherboard doesn’t have a Thunderbolt (tbt_3 or tbt_4) header and there are no special CPU / chipset requirements. It’s just an Intel Xeon based motherboard/cpu combination with a Gigabyte GC 2.0 Titan Ridge PCIe Thunderbolt 3 card.
I used the work ‘hack’ lightly above. To get a server without a dedicated thunderbolt header to see the PCIe card, you need to short pins 3 and 5 together like this:

In effect, this tells the card that it’s plugged in. The THB_C port on a “Thunderbolt™ Enabled” motherboard may provide extra DisplayPort capability. I wasn’t able to find a conclusive reason for the tbt header connection aside from theories about vendor locking. I’m sure it’s in the Intel Thunderbolt whitepaper (GPIO) but I haven’t looked it over yet. More information about the TBT Motherboard header and pinout can be found below.
All I know is that if you get this card and it doesn’t appear in your device list, you may need to short these two wires. I take no responsibility for anything that happens if you do this and something bad happens - please research accordingly.
Now that the card is installed and internal cables are connected it’s time to power up the NAS Server.
Configuration
Host 1: NAS-04 (Linux)
This host is a Linux server. It’s running on a Supermicro X10SRL-F motherboard with an Intel Xeon CPU. The chassis’ are two Supermicro 836A. One chassis is the NAS server, the other is a DAS (Disk shelf) attached to the NAS for a total of 32+ removable disk bays.
After powering up the NAS server we can see the Titan Ridge card using lspci:
1 | 02:00.0 PCI bridge: Intel Corporation JHL7540 Thunderbolt 3 Bridge [Titan Ridge 4C 2018] (rev 06) |
We can see more information in the /sys/bus/thunderbolt kernel syspath. This is the output prior to connecting a thunderbolt cable to another host:
1 | root@nas-04:/sys/bus/thunderbolt # tree |
After connecting the thunderbolt cable the thunderbolt0 device comes up as 0-3.0:
1 | root@nas-04:/sys/bus/thunderbolt # tree |
… and we can view the relevant kernel message buffer lines (log) with dmesg:
1 | [Sun Jul 25 16:24:56 2021] thunderbolt-net 0-3.0 thunderbolt0: ThunderboltIP login timed out |
Interestingly, we can also see that the Mac Mini is immediately auto discovered and that the thunderbolt0 network interface has become available. I thought I would have to start the kernel module (driver) for thunderbolt-net, but it looks like it happened automatically.
You can check to see if the thunderbolt and thunderbolt-net kernel modules are loaded using lsmod. If you don’t see them listed, you can manually load them with modprobe thunderbolt and modprobe thunderbolt-net.
After the network device becomes available we can address and configure it using standard userspace tools. I use good old ifconfig to set a non-link-local (not automatic 169.254.x.x) IP address for the interface. Using ip addr or other userspace tools (GUI) should work just fine.
1 | root@nas-04:~ # ifconfig thunderbolt0 10.10.10.2 |
Now that the interface has an IP, we have to add a static host route entry for it to communicate:
1 | # Add static host route |
Next, we just need to set up the Thunderbolt routeable IP on the Mac.
Host 2: Apple Mac Mini
The other host in this setup a Mac Mini. Thunderbolt 4 is not a requirement for this setup and neither is Apple Silicon. Thunderbolt is an Intel™ Specification and any hardware that has license from Intel should work equally well. This host is running MacOS Big Sur / Monterey.
Here we can see the new network service(s) that came up after connecting the Thunderbolt cable between the machines - Thunderbolt Ethernet Slot 1 and Thunderbolt Bridge:
1 | mini-01:~ cbergeron$ networksetup -listallnetworkservices |
Much the way we set an IP on the Linux host, we will do the same thing on the Mac. You can set the IP of the TB interface however you want. Either via the command line with posix tools:
1 | mini-01:~ cbergeron$ ifconfig thunderbolt0 10.10.10.2 |
or macos commands:
1 | mini-01:~ cbergeron$ networksetup -getinfo "Thunderbolt Bridge" |
Or, using the UI:

Benchmarks
This is probably the part of this post that you came here for.
To benchmark the connection speed I used iperf3 so that disk I/O isn’t a variable. Even though I’m using tiered storage including NVMe’s on the NAS server, at this point I’m just interested in the connection capability. Here are the results from iperf3 -s on the Mac mini:
1 | ----------------------------------------------------------- |
Not bad. Not quite what I was expecting though. I initially thought I would see closer to 35Gbps (40Gbps minus 10-15% overhead). This is more inline with 85% of 20 Gbps.
I know that Thunderbolt 3 and 4 are rated at 40Gbps:

Interesting. It’s almost exactly half of what I expected. Could it be that it’s operating at half duplex?
Let’s check the PHY link speed (NAS):
1 | $ cat /sys/bus/thunderbolt/devices/0-1/tx_speed /sys/bus/thunderbolt/devices/0-1/rx_speed |
Aha. It’s 20Gb/s per direction. 20 transmit (tx), 20 receive (rx). Huh, TIL.
And the Mac:

To dig deeper I decided to try transmitting and receiving simultaneously. In theory, I should get ~17Gbps from each server as both a sender and receiver for a link saturation around 34 Gbps. Let’s see what happens:

Well damn. I’m not quite sure what to make of this. (Please comment below if you have any insights)
To further reduce the equation I tried to test speeds between two Macs over Thunderbolt (both M1 processors, both Thunderbolt 3) to see if there’s an issue with the PCIe Ridge Titan card or the cable. One is a 2020 Macbook Air, the other is the 2020 Mac Mini.
1 | bash-3.2$ sudo iperf3 -s |
Better, but not by much. It’s 20Gbps, not 34Gbps. Thunderbolt is 40Gbps but I’m only seeing half that. I know I don’t have a PCIe bottleneck because Thunderbolt uses 4 lanes of PCIe 3.0, which it has (dedicated).
When I look at the link speed, I can see that the link between the two Mac’s over Thunderbolt is 40Gbps:

So, that’s as far as I’ve gotten thus far.
In summary:
- Mac to Mac: 40 Gb/s x1, link width 0x2
- Mac to Linux: 20 Gb/s x2, link width 0x1
It just occurred to me that Thunderbolt 4 is guaranteed 40 Gbps. Thunderbolt 3 is not. Remember how I mentioned STANDARDIZATION at the beginning of this post as the only major difference between TB4 and TB3? Perhaps total throughput is as well.
Thunderbolt Header
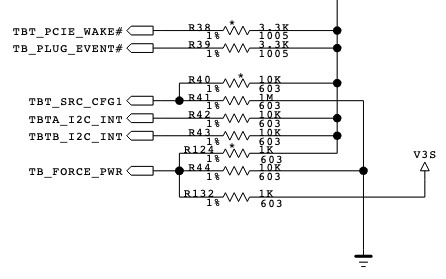
This information is not authoritative but I’m providing it here for reference. This table illustrates what I believe the pinouts are:
| Pin | Name | TBT Controller | Motherboard | Alpine Ridge Controller | Misc Other | Notes |
|---|---|---|---|---|---|---|
| 5 | Force Power | POC_GPIO_3 | TBT_FORCE_PWR | IN,FORCE FULL POWER ON | Power | |
| 4 | Plug Event | GPIO_5 | TBT_CIO_PLUG_EVENT# | OUT, HOT PLUG INDICATION | Plug Event | Connect to PCH (Make sure PCH supports SCI); might goes high when USB-C device is plugged in |
| 3 | S3 Sleep Indication | POC_GPIO_5 | TBT_SLP_S3# | IN,SLP S3 INDICATION | Platform Sequence Control | S3 is ACPI Suspend, likely used in this context here |
| 2 | S4_S5 | ? | ? | ? | Platform Sequence Control | Potentially wired to RESET_N on Thunderbolt Controller |
| 1 | Ground | GND | GND | Ground |
This is an informative post on superuser.com
The consensus appears to be that 5 is power, 1 is ground and these two should never be shorted together. Based on the schematic of the Alpine Ridge card, a few things are confirmed:

- The POC_GPIO pins are all inputs.
- GPIO_3 is tied to ground through a 100k resistor
- GPIO_5 is TB_PLUG_EVENT#

Next Steps
I’ve ordered another Thunderbolt 4 Cable so I can create a dual link Thunderbolt Bridge between the Mac and the NAS. Unfortunately, they’re not cheap and they’re not even fiber yet. However, even if I don’t use them in a permanent capacity here, I’ll have an extra on hand for USB4 or another USB-C use.
To troubleshoot the uneven simultaneous TX / RX speeds between the Mac and the Linux server, I’ll try to test between the two Macs to see if I get more consistent bilateral speeds there. I’m also going to check the CPU and Memory pressure just to see how they’re affected by transferrring 500GB. I’ll update this post with my findings.
I’m going to look over the Linux kernel driver code to see if there’s anything there that could be throttling. Thunderbolt was supposed to have a 10Gbps bandwidth throttle to allow for DisplayPort and USB, but it appears to have been unofficially lifted (or Apple is doing something proprietary between hosts).
Notes, Errata, Miscellany, et al., TBD., ad nausem, La donna è mobile, etc.
Cables
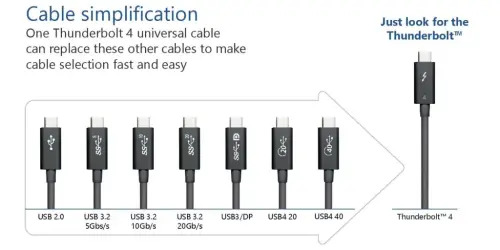
It’s important to use Thunderbolt 3/4 cables and not just any USB-C cable because there are many types of USB-C cables. USB-C is the form factor of the connector. That’s it. The connector. It’s not even wire compatible. Some cables only connect power wires (charging cables).
Thunderbolt 4 is a regorous specification by design. The primary benefit of Thunderbolt 4 over Thunderbolt 3 is not performance - it’s STANDARDIZATION. If you buy a Thunderbolt 4 device, it can only receive the offical Intel™ Thunderbolt™ 4™ Certification™ if it complies with all* of the protocol specs. I kid about the numerous Trademark symbols (™), but Intel and Apple have done everyone a favor here. Thunderbolt 4 is designed to reduce the confusion that USB 3 and USB4 have.

Currently, in the USB-C form factor there are USB-C Charging cables, data transfer cables, multi-purpose cables, low-speed cables and 10Gbps and 20Gbps cables. If you’ve ever shopped for a USB-C anything on popular sites like smile.amazon.com, you’ll see marketing bar graphs that show how fast USB-C is. Well, USB 3.0 is. Well, USB 3 Gen 1, not USB 3.0. Actually - even faster is USB 3 Gen 2 (USB-C). If the cable isn’t used in a USB hub. Or if it is, it has to be connected to a Powered USB 3.x Dock.
Confusing isn’t it?
Thunderbolt 4 will hopefully do away with all of that (but with a higher price tag).
USB 3.whatever and USB4 protocols can run over Thunderbolt, but not the other way around.
Other Notes
You may lose functionality if your motherboard doesn’t have a Thunderbolt header and you use the workaround I indicated above (shorting pins 3 and 5). Specifically, the ability to cycle the cards power from Linux since we’re forcing the board ‘on’.
Credit(s)
Much thanks goes to Mika Westerberg @ Intel for the linux kernel work along with everyone at LKML that worked on it. Also, karatekid430 for his excellent resources on Thunderbolt in the kernel guide 2019-11-12.pdf
Christian Kellner - for his excellent work on the Thunderbolt Linux userspace utils and presentations. Please visit his blog and like or follow him if you’re interested in more about Thunderbolt on Linux.
https://christian.kellner.me/2018/04/23/the-state-of-thunderbolt-3-in-fedora-28/
And of course Apple™ and Intel™ for joining resources for this specification - even if only for a brief period of time.
Further Reading / Resources
Larry Jordan’s excellent Thunderbolt Introduction
Thunderbolt 3 - Arch Wiki
What Is Thunderbolt 4? Why This New Interface Will Matter in PCs in 2021
Thunderbolt 3 Vs. USB-C: What’s The Difference?
Questions / Comments / Suggestions
If you’ve enjoyed this post, please follow me on twitter and/or leave a comment below. Is there anything I should try? Increasing the transmission MTU perhaps? Or maybe you know why I get strange speeds when I TX and RX simultaneously …
Ultra fast Thunderbolt NAS with Apple M1 and Linux
https://chrisbergeron.com/2021/07/25/Ultra-fast-Thunderbolt-NAS-with-Apple-M1-and-Linux/


